반응형


RAC_ASM설치 ( OEL5 + ORACLE 11g )


6. DB생성


- 재부팅하고 oracle계정으로 로그인후 dbca 시작


[oracle@rac1 ~]$ dbca


- DB생성 확인


[oracle@rac1 database]crs_stat -t


반응형
반응형


RAC_ASM설치 ( OEL5 + ORACLE 11g )


4. 11g Engine 설치


grid 설치 완료후 재부팅하고 oracle계정으로 로그인. 


 engine 설치 시작 


[oracle@rac1 ~]$ cd database

[oracle@rac1 database]$ ./runInstaller


- node1,2에서 각각 스크립트 실행


[oracle@rac1 ~]$ su -

[oracle@rac1 ~]# /app/oracle/11g/db/root.sh


- Engine설치완료


5. ASM 구성


- ASM configuration assistant 실행


[oracle@rac1 ~]$ asmca


        -  상태확인


[oracle@rac1 database]$ crs_tat -t


반응형
반응형


RAC_ASM설치 ( OEL5 + ORACLE 11g )


3. grid 설치


 grid 설치 시작 


[oracle@rac1 ~]$ cd grid

[oracle@rac1 grid]$ ./runInstaller


- node1,2에서 각각 패키지 설치  


[oracle@rac1 ~]$ su -

[oracle@rac1 ~]# cd /media/Oracle\ Linux\ Server\ dvd\ 20110119/Server/

[oracle@rac1 Server]# rpm -ivh libaio-devel-0.3.106-5.i386.rpm

경고: libaio-devel-0.3.106-5.i386.rpm: Header V3 DSA signature: NOKEY, key ID 1e5e0159

준비 중...               ########################################### [100%]

   1:libaio-devel           ########################################### [100%]


[root@rac1 Server]#


          - 다시 확인 


- 모두 무시 체크 


- 스크립트 실행 (순서 잘지켜야함)


[root@rac1 Server]# /app/oraInventory/orainstRoot.sh

..완료

[root@rac2 Server]# /app/oraInventory/orainstRoot.sh

..완료


[root@rac1 Server]# /app/11g/grid/root.sh
.....succeeded.
[root@rac2 Server]# /app/11g/grid/root.sh
.....succeeded.


 grid 설치완료


   ( 당황하지않고 확인)


- 상태확인


[oracle@rac1 grid]$ crs_stat -t


- GSD(global service daemon) 가동 


[oracle@rac1 grid]srvctl enable nodeapps -g

[oracle@rac1 grid]srvctl start nodeapps

[oracle@rac1 grid]$  ocr check


- crs_stat 확인


[oracle@rac1 grid]crs_stat -t


반응형
반응형


RAC_ASM설치 ( OEL5 + ORACLE 11g )


1. VMware 설정 및 리눅스 설치


  VMware (rac1) 설정  


- virtual machine name: rac1


- RAM: 1500MB


- HDD: 30GB


- Disk file name: rac1.vmdk


- 불필요한 하드웨어 삭제 : Edit virtual machine settings -> Floppy, USB controller, Sound card, Printer 삭제


- Add Hard ware type : Network Adapter 추가


- Network Adaptor type: Host-only


Add Hard ware type : HDD추가


- virtual disk type: SCSI

- Mode: Independent - persistent


-disk size/ Allocate all disk space now / single file


- Disk file name


Advanced setting


- Virtual device node :SCSI 1:0

- Mode: Independent - persistent


           - 이렇게 각각 총 6개 HDD 추가.


                      ocr_vote01 1G SCSI 1:0


               ocr_vote02 1G SCSI 1:1


               ocr_vote03 1G SCSI 1:2


               asm01         5G SCSI 1:3


               asm02         5G SCSI 1:4


               asm03         5G SCSI 1:5


- rac1 폴더의 rac1.vmx 파일 메모장으로 열고 내용 추가.


disk.locking = "FALSE"

diskLib.dataCacheMaxSize = "0"

scsi1.sharedBus = "virtual"


scsi1:0.deviceType = "disk"

scsi1:1.deviceType = "disk"

scsi1:2.deviceType = "disk"

scsi1:3.deviceType = "disk"

scsi1:4.deviceType = "disk"

scsi1:5.deviceType = "disk"


  OEL5 설치  


- Partition (/sda만)

/            7000

/boot      100

/var       1000

swap     3000

/home   8000

/app     나머지


- Network devices : eth0, eth1 모두 Active
- Hostname : rac1


- 패키지 설치 : 사용자정의  ( 개발도구 모두 선택, 서버 모두 체크해제, 시스템툴 선택)


 - 시스템도구 -> 오른쪽 하단에 optional pakage선택


ocfs2-2.6.18-238.el5-1.4.6.-2.el5.i686

ocfs2-tools-1.6.3-2.el5.i386
ocfs2-console-1.6.3-2.el5.i386
oracleasm-2.6.18-238.el5-2.0.5.1.el5.i686
oracleasm-support-2.1.4-1.el5.i386
sysstat-7.0.2-3.el5_5.1.i386


2. node 설정 


 node_1 (rac1) 설정 


- 주소확인


ifconfig :   ip, netmask 주소확인

eth0 ip - 172.16.133.131

eth1 ip - 172.16.23.130

netmask - 255.255.255.0


netstat -nr :  gateway 172.16.133.2


- 주소바꾸기

rac1                rac2


eth0 (NAT) = public     172.16.133.100     172.16.133.200

eth1 (host) = private    172.16.23.111       172.16.23.222

eth0 (NAT) = vip          172.16.133.10       172.16.133.20


gw             172.16.133.2  (eth1은 gw설정 안함)

dns            168.126.63.1


- vi /etc/hosts 내용추가


[root@rac1 ~]# vi /etc/hosts


# public

172.16.133.100        rac1

172.16.133.200        rac2

# private

172.16.23.111         rac1-priv

172.16.23.222         rac2-priv

# vip

172.16.133.10         rac1-vip

172.16.133.20         rac2-vip

172.16.133.30         rac-scan


리눅스 부팅 후 불필요한 서비스 OFF 


[root@rac1 ~]# chkconfig --level 123456 xinetd off

[root@rac1 ~]# chkconfig --level 123456 sendmail off

[root@rac1 ~]# chkconfig --level 123456 cups off

[root@rac1 ~]# chkconfig --level 123456 cups-config-daemon off

[root@rac1 ~]# chkconfig --level 123456 smartd off

[root@rac1 ~]# chkconfig --level 123456 isdn off

[root@rac1 ~]# chkconfig --level 123456 iptables off


- 계정생성


[root@rac1 ~]# groupadd -g 5000 dba

[root@rac1 ~]# groupadd -g 5001 oinstall

[root@rac1 ~]# useradd -g oinstall -G dba oracle

[root@rac1 ~]#

[root@rac1 ~]# passwd oracle


-  winscp로 설치파일옮기고,  설치파일 압축해제 및 권한변경


[oracle@rac1 ~]# cd /home/oracle

[root@rac1 oracle]#  unzip p10098816_112020_LINUX_1of7.zip && unzip p10098816_112020_LINUX_2of7.zip && unzip p10098816_112020_LINUX_3of7.zip


[root@rac1 oracle]# chown -R oracle.oinstall /home/oracle


vi /etc/sysctl.conf 내용 추가


[oracle@rac1 ~]# vi /etc/sysctl.conf


kernel.shmmni = 4096

kernel.sem = 250 32000 100 128

net.ipv4.ip_local_port_range = 9000 65500

net.core.wmem_max = 1048576

net.core.rmem_default = 4194304

net.core.rmem_max = 4194304

net.core.wmem_default = 262144

fs.file-max = 6815744

fs.aio-max-nr = 1048576


 vi /etc/security/limits.conf 내용 추가


[oracle@rac1 ~]# vi /etc/security/limits.conf


grid soft nproc 2047

grid hard nproc 16384

grid soft nofile 1024

grid hard nofile 65536

oracle soft nproc 2047

oracle hard nproc 16384

oracle soft nofile 1024

oracle hard nofile 65536


 vi /etc/pam.d/login 내용 추가


[oracle@rac1 ~]# vi /etc/pam.d/login


session     required     pam_limits.so


 vi /etc/modprobe.conf 내용 추가


[oracle@rac1 ~]# vi /etc/modprobe.conf


options hangcheck-timer hangcheck_tick=30 hangcheck_margin=180


  modprobe


[root@rac1 ~]# modprobe -v hangcheck-timer

insmod /lib/modules/2.6.18-238.el5/kernel/drivers/char/hangcheck-timer.ko hangcheck_tick=30 hangcheck_margin=180


 vi /etc/rc.local 내용추가 


[oracle@rac1 ~]# vi /etc/rc.local


/sbin/modprobe hangcheck-timer

rdate -s 203.248.240.140


 vi /etc/sysconfig/ntpd  (options= -x 추가 )


[oracle@rac1 ~]# vi /etc/sysconfig/ntpd


-x


 ntpd 재시작


[root@rac1 ~]# service ntpd restart

ntpd를 종료중:                                               [ 실패 ]

ntpd: 시간서버와 동기화함:                            [  OK  ]

ntpd (을)를 시작 중:                                       [  OK  ]


[root@rac1 ~]# chkconfig --level 123456 ntpd on

[root@rac1 ~]#

[root@rac1 ~]# chown -R oracle.oinstall /app

[root@rac1 ~]# chmod -R 755 /app


 vi .bash_profile (root) 내용추가


[root@rac1 ~]# vi .bash_profile


export GRID_HOME=/app/11g/grid

export PATH=$PATH:$HOME/bin:$GRID_HOME/bin


 vi /home/oracle/.bash_profile 내용추가


[root@rac1 ~]# vi /home/oracle/.bash_profile


export EDITOR=vi

export TMP=/tmp

export TMPDIR=$TMP

export ORACLE_HOSTNAME=rac1

export ORACLE_UNQNAME=racdb

export ORACLE_BASE=/app/oracle

export ORACLE_HOME=$ORACLE_BASE/11g/db

export GRID_HOME=/app/11g/grid

export ORACLE_SID=racdb1

export ORACLE_TERM=xterm

export PATH=/usr/sbin:$PATH

export PATH=$ORACLE_HOME/bin:$GRID_HOME/bin:$PATH

export LD_LIBRARY_PATH=$ORACLE_HOME/lib:/lib:/usr/lib

export CLASSPATH=$ORACLE_HOME/JRE:$ORACLE_HOME/jlib:$ORACLE_HOME/rdbms/jlib


 파티션 분할 (sdb,sdc,sdd,sdf,sdg)


[root@rac1 ~]# fdisk /dev/sdb


Command (m for help): n

Command action

   e   extended

   p   primary partition (1-4)

p

Partition number (1-4): 1

First cylinder (1-130, default 1):

Using default value 1

Last cylinder or +size or +sizeM or +sizeK (1-130, default 130):

Using default value 130


Command (m for help): w

The partition table has been altered!


Calling ioctl() to re-read partition table.

Syncing disks.

[root@rac1 ~]#


 ASM환경설정 


[root@rac1 ~]# oracleasm configure -I

Configuring the Oracle ASM library driver.


This will configure the on-boot properties of the Oracle ASM library

driver.  The following questions will determine whether the driver is

loaded on boot and what permissions it will have.  The current values

will be shown in brackets ('[]').  Hitting <ENTER> without typing an

answer will keep that current value.  Ctrl-C will abort.


Default user to own the driver interface []: oracle

Default group to own the driver interface []: oinstall

Start Oracle ASM library driver on boot (y/n) [n]: y

Scan for Oracle ASM disks on boot (y/n) [y]: y


The next two configuration options take substrings to match device names.

The substring "sd" (without the quotes), for example, matches "sda", "sdb",

etc.  You may enter more than one substring pattern, separated by spaces.

The special string "none" (again, without the quotes) will clear the value.


Device order to scan for ASM disks []:

Devices to exclude from scanning []:

Writing Oracle ASM library driver configuration: done


[root@rac1 ~]#


 마운트 포인트 생성


[root@rac1 ~]# oracleasm init

Creating /dev/oracleasm mount point: /dev/oracleasm

Loading module "oracleasm": oracleasm

Mounting ASMlib driver filesystem: /dev/oracleasm


  공유디스크 생성 (/dev/oracleasm 밑에 생성됨)


[root@rac1 ~]# oracleasm createdisk ocr_vote01 /dev/sdb1

Writing disk header: done

Instantiating disk: done

[root@rac1 ~]# oracleasm createdisk ocr_vote02 /dev/sdc1

Writing disk header: done

Instantiating disk: done

[root@rac1 ~]# oracleasm createdisk ocr_vote03 /dev/sdd1

Writing disk header: done

Instantiating disk: done

[root@rac1 ~]# oracleasm createdisk asm01 /dev/sde1

Writing disk header: done

Instantiating disk: done

[root@rac1 ~]# oracleasm createdisk asm02 /dev/sdf1

Writing disk header: done

Instantiating disk: done

[root@rac1 ~]# oracleasm createdisk asm03 /dev/sdg1

Writing disk header: done

Instantiating disk: done

[root@rac1 ~]#


  생성 리스트 확인하고 시스템 종료


[root@rac1 ~]# oracleasm scandisks

Reloading disk partitions: done

Cleaning any stale ASM disks...

Scanning system for ASM disks...

[root@rac1 ~]# oracleasm listdisks

ASM01

ASM02

ASM03

OCR_VOTE01

OCR_VOTE02

OCR_VOTE03

[root@rac1 ~]# chown -R oracle.oinstall /dev/oracleasm

[root@rac1 ~]#

[root@rac1 ~]# init 0


 node_2 설정 


- rac1 폴더의 vmdk, vmx 파일을 rac2 폴더로 복사한후 rac2로 이름변경


- rac2.vmx파일 메모장으로 열고 rac1을 rac2로 모두 수정


- VMware에서 rac2.vmx 불러온후 i copied it.


  주소바꾸기 : 앞에 node1에서 지정했던 주소로 바꿔줌 (#neateth0,2.bak은 비활성화후 삭제


rac1                rac2


eth0 (NAT) = public     172.16.133.100     172.16.133.200

eth1 (host) = private    172.16.23.111       172.16.23.222

eth0 (NAT) = vip          172.16.133.10       172.16.133.20


gw             172.16.133.2 (eth1은 gw설정 안함)

dns            168.12


 vi /home/oracle/.bash_profile (rac1 -> rac2 로 수정) 


[root@rac2 ~]# vi /home/oracle/.bash_profile


export EDITOR=vi

export TMP=/tmp

export TMPDIR=$TMP

export ORACLE_HOSTNAME=rac2

export ORACLE_UNQNAME=racdb

export ORACLE_BASE=/app/oracle

export ORACLE_HOME=$ORACLE_BASE/11g/db

export GRID_HOME=/app/11g/grid

export ORACLE_SID=racdb2

export ORACLE_TERM=xterm

export PATH=/usr/sbin:$PATH

export PATH=$ORACLE_HOME/bin:$GRID_HOME/bin:$PATH

export LD_LIBRARY_PATH=$ORACLE_HOME/lib:/lib:/usr/lib

export CLASSPATH=$ORACLE_HOME/JRE:$ORACLE_HOME/jlib:$ORACLE_HOME/rdbms/jlib


 node1에서 rpm설치후 node2에도 rpm파일전송하고 설치


[root@rac1 ~]# cd /home/oracle/grid/

[root@rac1 grid]# cd rpm/

[root@rac1 rpm]#

[root@rac1 rpm]# export CVUQDISK_GRP=dba

[root@rac1 rpm]# rpm -ivh cvuqdisk-1.0.9-1.rpm

           준비중:             ########################################### [100%]

   1:cvuqdisk               ########################################### [100%]

[root@rac1 rpm]# scp cvuqdisk-1.0.9-1.rpm rac2:~/

The authenticity of host 'rac2 (172.16.133.200)' can't be established.

RSA key fingerprint is 18:e2:c7:0b:4e:bd:7e:98:7b:7a:f8:b1:7e:2a:11:e2.

Are you sure you want to continue connecting (yes/no)? yes

Warning: Permanently added 'rac2,172.16.133.200' (RSA) to the list of known hosts.

root@rac2's password:

cvuqdisk-1.0.9-1.rpm                          100% 8233     8.0KB/s   00:00


[root@rac2 ~]# export CVUQDISK_GRP=dba

[root@rac2 ~]# rpm -ivh cvuqdisk-1.0.9-1.rpm

       준비중‘...               ########################################### [100%]

   1:cvuqdisk               ########################################### [100%]

[root@rac2 ~]#


반응형
반응형


Install ORACLE 11g on RHEL5


 Engine 생성전


- oracle 계정생성 


[root@server114 root]groupadd g 5000 dba

[root@server114 root]# useradd g dba oracle

[root@server114 root]passwd oracle


- winscp 파일전송 


linux_11gR2_database_1of2.zip              /home/oracle

linux_11gR2_database_2of2.zip              /home/oracle


- 메모리, 디스크권장사항 확인하기


[root@server114 ~]# grep SwapTotal /proc/meminfo

SwapTotal:     2048248 kB

[root@server114 ~]# free

                   total       used       free     shared    buffers     cached

Mem:       1035200     510560     524640          0      24468     384800      // 최소한의 메모리 1GB

-/+ buffers/cache:     101292     933908

Swap:      2048248          0    2048248                                             // swap : 메모리의 1.5배~2배

[root@server114 ~]# df -h /tmp
Filesystem            Size  Used Avail Use% Mounted on
/dev/sda3           4.8G  2.9G  1.7G  65% /                                         // tmp  디렉토리 1 GB  이상 되야함


- 필수 패키지 권장사항 확인하기(아래의 패키지 중 하나라도 설치되어 있지 않다면 꼭 찾아서 설치하고 다음으로 진행.)


binutils-2.17.50.0.6

compat-libstdc++-33-3.2.3

elfutils-libelf-0.125

elfutils-libelf-devel-0.125

elfutils-libelf-devel-static-0.125

gcc-4.1.2

gcc-c++-4.1.2

glibc-2.5-24

glibc-common-2.5

glibc-devel-2.5

glibc-headers-2.5

kernel-headers-2.6.18

ksh-20060214

libaio-0.3.106

libaio-devel-0.3.106

libgcc-4.1.2

libgomp-4.1.2

libstdc++-4.1.2

libstdc++-devel-4.1.2

make-3.81

numactl-devel-0.9.8.i386

sysstat-7.0.2

unixODBC-32bit-2.2.11

unixODBC-devel-2.2.11


[root@server114 Server]# pwd

/media/RHEL_5.3 i386 DVD/Server


[root@server114 Server]#

[root@localhost Server]# rpm -qa | grep binutils-2.17.50.0.6

binutils-2.17.50.0.6-14.el5

[root@localhost Server]# rpm -qa | grep compat-libstdc++-33-3.2.3

compat-libstdc++-33-3.2.3-61

[root@localhost Server]# rpm -qa | grep elfutils-libelf

elfutils-libelf-devel-static-0.137-3.el5

elfutils-libelf-devel-0.137-3.el5

elfutils-libelf-0.137-3.el5

[root@localhost Server]# rpm -qa | grep gcc-4.1.2

libgcc-4.1.2-50.el5

gcc-4.1.2-50.el5

[root@localhost Server]# rpm -qa | grep gcc-c++-4.1.2

gcc-c++-4.1.2-50.el5

[root@localhost Server]# rpm -qa |grep glibc-2.5

glibc-2.5-58

[root@localhost Server]# rpm -qa | grep glibc-common

glibc-common-2.5-58

[root@localhost Server]# rpm -qa | grep glibc-devel

glibc-devel-2.5-58

[root@localhost Server]# rpm -qa | grep glibc-headers

glibc-headers-2.5-58

compat-glibc-headers-2.3.4-2.26

[root@localhost Server]# rpm -qa | grep kernel-headers-2.6.18

kernel-headers-2.6.18-238.el5

[root@localhost Server]# rpm -qa | grep ksh

ksh-20100202-1.el5_5.1

[root@localhost Server]# rpm -qa | grep libaio

libaio-0.3.106-5 

[root@localhost Server]# rpm -qa | grep libaio-devel   

[root@server114 Server]# rpm -Uvh libaio-devel-0.3.106-3.2.i386.rpm

warning: libaio-devel-0.3.106-3.2.i386.rpm: Header V3 DSA signature: NOKEY, key ID 37017186

Preparing...                ########################################### [100%]


   1:libaio-devel           ########################################### [100%]


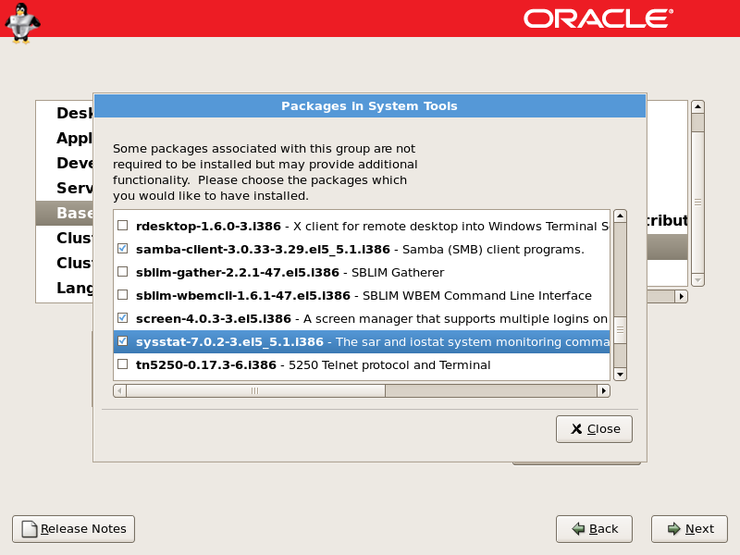
[root@server114 Server]# rpm -qa | grep libgcc-4.1.2

libgcc-4.1.2-44.el5

[root@server114 Server]# rpm -qa | grep libgomp

libgomp-4.3.2-7.el5

[root@server114 Server]# rpm -qa | grep libstdc++

compat-libstdc++-296-2.96-138

libstdc++-devel-4.1.2-44.el5

compat-libstdc++-33-3.2.3-61

libstdc++-4.1.2-44.el5

[root@server114 Server]# rpm -qa | grep make-3.81

make-3.81-3.el5

[root@server114 Server]# rpm -qa | grep numactl-devel

[root@server114 Server]# rpm -Uvh numactl-devel-0.9.8-7.el5.i386.rpm

warning: numactl-devel-0.9.8-7.el5.i386.rpm: Header V3 DSA signature: NOKEY, key ID 37017186

Preparing...                ########################################### [100%]

   1:numactl-devel          ########################################### [100%]

[root@server114 Server]#

[root@server114 Server]#

[root@server114 Server]# rpm -qa | grep sysstat-7.0.2

[root@server114 Server]# rpm -ivh sysstat-7.0.2-3.el5.i386.rpm

warning: sysstat-7.0.2-3.el5.i386.rpm: Header V3 DSA signature: NOKEY, key ID 37017186

Preparing...                ########################################### [100%]

   1:sysstat                ########################################### [100%]

[root@server114 Server]# rpm -qa | grep unixODBC-32bit-2.2.11

[root@server114 Server]# rpm -ivh unixODBC-*

warning: unixODBC-2.2.11-7.1.i386.rpm: Header V3 DSA signature: NOKEY, key ID 37017186

Preparing...                ########################################### [100%]

   1:unixODBC               ########################################### [ 33%]

   2:unixODBC-devel         ########################################### [ 67%]

   3:unixODBC-kde           ########################################### [100%]


[root@server114 Server]#


- 설치에 필요한 그룹과 사용자 생성 및 수정


[root@localhost Server]# groupadd  oinstall


[root@localhost Server]# groupadd  oper

[root@localhost Server]# usermod -g oinstall -G dba,oper  oracle


- 설치할 사용자의 Resource Limit 값을 확인하고 수정


[root@localhost ~]# vi /etc/security/limits.conf


Oracle  soft  nproc  2047

Oracle  hard  nproc  16384

Oracle  soft  nofile  1024

oracle  hard  nofile  65536


oracle  soft  stack  10240


- 커널파라미터 설정하기


[root@localhost ~]# vi /etc/sysctl.conf  ( 아래 내용 추가 후 저장공백대소문자 주의)


fs.aio-max-nr = 1048576

fs.file-max = 6815744

kernel.shmall = 2097152

kernel.shmmax = 536870912

kernel.shmmni = 4096

kernel.sem = 250 32000 100 128

net.ipv4.ip_local_port_range = 9000 65500

net.core.rmem_default = 262144

net.core.rmem_max = 4194304

net.core.wmem_default = 262144

net.core.wmem_max = 1048586


[root@localhost ~]# sysctl –p          // 위 설정값을 적용 


- oracle 사용자의 환경설정


[root@localhost ~]# vi /home/oracle/.bash_profile


export EDITOR=vi

export ORACLE_BASE=/app/oracle

export ORACLE_HOME=$ORACLE_BASE/product/11g

export ORACLE_SID=testdb

export LANG=ko_KR.eucKR

export ORACLE_TERM=xterm

export NLS_LANG=AMERICAN_AMERICA.KO16MSWIN949

export ORA_NLS33=$ORACLE_HOME/ocommon/nls/admin/data

export LD_LIBRARY_PATH=$ORACLE_HOME/lib:/lib:/usr/lib:/usr/local/lib

export PATH=$PATH:$ORACLE_HOME/bin


export CLASSPATH=$ORACLE_HOME/JRE:$ORACLE_HOME/jlib:$ORACLE_HOME/rdbms/jlib


[root@server114 Server]# vi /etc/pam.d/login


session   required   pam_limits.so


- oracle 설치 파일 압축 풀기


[oracle@localhost oracle]# pwd

/home/oracle

[root@localhost oracle]# ls -l

-rw-r--r-- 1 oracle dba 1285396902 Jun  2  2010 linux_11gR2_database_1of2.zip

-rw-r--r-- 1 oracle dba  995359177 Jun  2  2010 linux_11gR2_database_2of2.zip


[root@localhost oracle]# unzip linux_11gR2_database_1of2.zip && unzip linux_11gR2_database_2of2.zip


[root@localhost oracle]# chown  -R  oracle.dba  /home/oracle


[root@localhost oracle]# chown  -R  oracle.dba  /app


-  RHEL4 로그아웃 후 오라클계정으로 로그인.


● Engine(11.2.0.1) 생성


-  새터미널열어서 runInstaller 실행.


[root@server114 oracle]$ cd database

[root@server114 database]./runInstaller


   OUI   


1. security updates - 체크해제 -  next 


2. 경고창 - yes 


3. install database software only


4. single instance database installation 


5. Korean 추가


6 .Enterprise Edition 을 선택한 후 select Options 클릭


7. Oracle Partitioning 제외하고 나머지 체크 해제


8. Oracle Base  Oracle Home 디렉토리 설정 (환경설정파일 설정대로 되어 있음)


9. oracle inventory 디렉터리설정


10.관리그룹지정 - 기본값


11. 선행체크사항 점검 -  오른쪽 상단에 ∨ ignore all 


12. 요약


13. 엔진설치 진행


14. 루트로 스크립트 실행 


15. 설치종료


- 설치 확인


[oracle@localhost ~]$ sqlplus   as  sysdba


SQL*Plus: Release 11.2.0.1.0 Production on Sat Apr 13 10:23:32 2013


Copyright (c) 1982, 2009, Oracle.  All rights reserved.


Connected to an idle instance.


SQL> exit


● DB생성 (DBCA) :  DataBase Configuration Assistant


- 터미널에서 dbca 치면 database configuration assistant 시작


[oracle@server114 oracle]dbca 


1. DBCA 시작


2. 수행하고자 하는 작업 선택 - create a database  - next


3. DB생성할 템플리트선택 - general purpose - next


4 DB ID - testdb


5. Enterprise Manager 체크해제 


6. 계정암호 설정


7. 암호 복잡하게 하라는 경고 - yes


8. 데이터베이스 파일 저장방식 -  file system (기본값) -  file location variables 버튼눌러 정보확인


9.정보확인


10. Flash Recovery area 지정 - 기본값  


11. Sample schema 체크 (연습용 계정을 의미)


12. Memory: SGA  PGA 로 사용될 메모리 값 설정 - 기본값 - 세번째 탭(sizing) 이동


13. character set 설정 - 세번째옵션 - KO16MSWIN949 선택


14 위의 화면에서 All initialization Parameters 버튼을 누르면 현재까지 설정되어 있는 주요 파라미터들을 볼수있음


15. 요약


16. create databse


17.확인


18. DB생성시작


19. 생성완료


DB생성(11.2.0.1) 확인 


[oracle@server114 oracle]$ sqlplus / as sysdba


SQL*Plus: Release 11.2.0.1.0 Production on Wed Feb 25 02:09:09 2015


Copyright (c) 1982, 2009, Oracle.  All rights reserved.


Connected to:

Oracle Database 11g Enterprise Edition Release 11.2.0.1.0 - Production

With the Partitioning option


SQL> select status from v$instance;


STATUS

----------------

OPEN


SQL>


반응형